(Corrected spelling/grammar of "weigh" and added a clarification of the meaning of the 'density' value.) |
m (Spelling correction.) |
||
| Line 511: | Line 511: | ||
===Advanced interactive functions=== |
===Advanced interactive functions=== |
||
| − | These |
+ | These require some more lines to work properly, we recommend copying the .json file from the game files and then edit them to fit your mod. You can find the .json for all interactive parts here: |
Steam\steamapps\common\Scrap Mechanic\Data\Objects\Database\ShapeSets |
Steam\steamapps\common\Scrap Mechanic\Data\Objects\Database\ShapeSets |
||
Revision as of 02:40, 26 September 2020
The mod tool is made to ease the process of creating and sharing mods. With the mod tool you can easily manage all your mods through the steam workshop. If you make any changes to them, they will automatically stay up to date for everyone subscribed to them. At its current state the mod tool only supports adding new parts and blocks to the game, but more features are to be added in the future. Before you create your mod, please read through our GUIDELINES. If these guidelines are not followed we might have to ban your mod from the workshop.
To open the mod tool, go to your Steam Library and next to the search field press “GAMES” and select “TOOLS”. Locate “Scrap Mechanic Mod Tool”.
How to make a basic building block mod
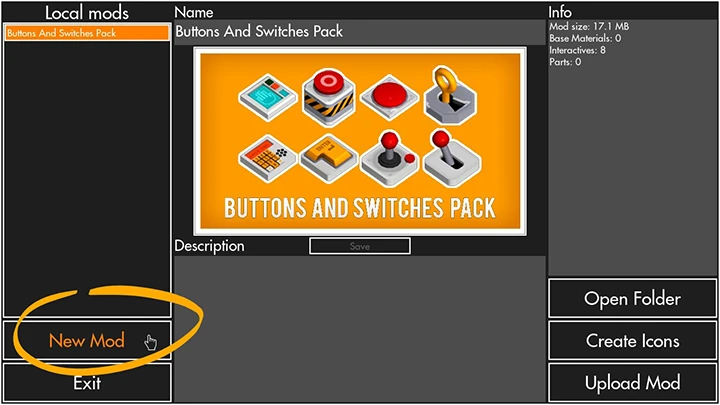
STEP 1: Launch the “Scrap Mechanic Mod Tool”. Press “New Mod” to create your mod, name it and write a neat description.
STEP 2: Press “Open Folder”
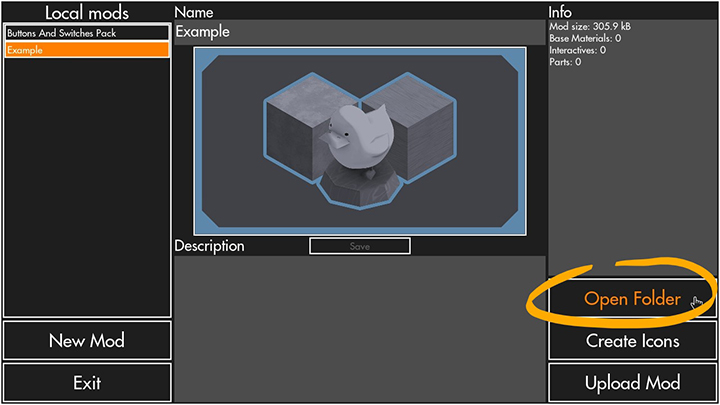
This is where you put all the files for your mod. Let’s go through each folder and their functions:
- Cache: This folder is for the stored data from your mod, you don’t put anything in here. Cache is automatically generated when uploading the mod.
- Gui: Gui stands for graphical user interface. The icons generated with the mod tool will be stored in this folder.
- Objects: Within this folder is the Database, Mesh and Texture folders. This is where you put your .json files, 3d models and textures.
- Description: In this file you write the inventory name and descriptions for your parts and blocks.
- Preview: This is the presentation image for your mod on the workshop. So make sure to make an appealing and informative preview picture.
STEP 3: Now let’s put the textures we want for our new block mod in the Textures folder Located here: Objects>Textures
We’re going to use these 512x512 texture files.
examplename_dif.tga examplename_asg.tga examplename_nor.tga
For more in-depth information about textures in Scrap Mechanic see
“How to make textures for scrap mechanic” further down
STEP 4: Navigate to: Objects>Database>Shapesets
Here you will see two .json files, one for blocks and one for parts. Since we’re making a block mod open the blocks.json file. It should be pretty empty, you need to add the proper information to define your new block.
To make this easier we have included a text documents that you can use as a template. Open the “block examples” text document and copy its contents. Go back to your blocks.json file. Now replace the text in your blocks.json file. So it looks like this:

STEP 5: Now it’s time to add the proper information in your .json file. The text marked with yellow is where you need to change it to match your files.

Let’s go through each of these functions:
- UUID: Every block/part has each own specific ID called UUID, no two blocks or parts share the same uuid. Generate your uuids HERE.
- dif/asg/nor: Is where you put in the names of your textures. It’s important that the textures are named correctly all dif textures must end with “_dif “ etc. The “.tga” is the texture format. For example if your texture is in PNG format it must say “.png”.
- color: This colour code tells the game what default colour your block/part will have. You can get the colour code you want from the colour picker in Photoshop or a website that generate colour codes.
- density: This is the volumetric weight of one block. 250 is light weight, 500 medium weight and 1250 is heavy weight. Example: A part with a volume of 8 blocks, with the density set to 250 will weigh 2000, but will still count as light weight.
- Tiling: This numbers tells the material how many blocks you can draw in a line before the texture repeats. Example, if your texture is 512x512 the correct tiling number would be 4.
- physicsMaterial: You can change collision sounds and effects by changing the material type.
For more in-depth information on how to edit .json files see “Block list functions” further down
STEP 6: Once you save the .json file you can finally enter the game and see the block ingame. But to add a title and description to your block you need navigate to Gui>Language>English map. Open “inventoryDescriptions example.txt”, copy the text and then paste it into “inventoryDescriptions.json” Replace the UUID with the one you previously generated for your block. Once that’s done you fill in your title and description.
STEP 7: Now when all the textures are added and the .json files have been correctly edited, you can go back to the Scrap Mechanic Mod Tool. Press the “Create Icons” button. Then launch scrap mechanic, make a new world and select your new block mod.
STEP 8: Congratulations! you’ve made your very first block mod.
If everything worked you should now be able to find your new block in the inventory
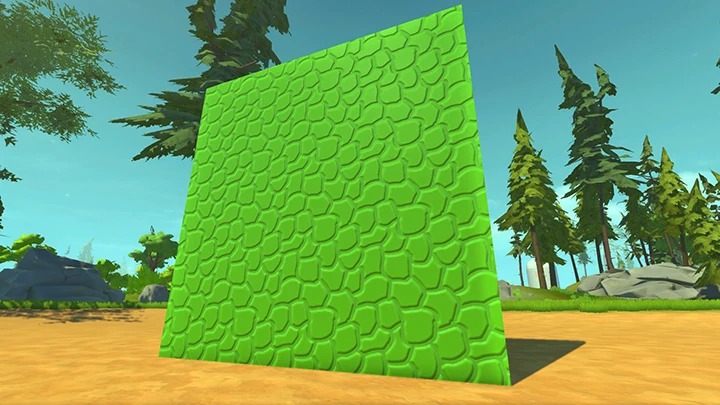
Here’s how the new block looks in-game. If you’re pleased with how your block looks you can share your mod on the steam workshop by pressing the upload button in the Scrap Mechanic Mod Tool. You also have to change visibility from hidden to public if you want other people in the community to be able to find it.
How to make a basic part mod
STEP 1: First off, you need to make a model. Before exporting, make sure your model is placed in origo with the pivot centered. Also the the pivot axis of the model should follow the example below.
| Axis | Direction |
| X | Right |
| Y | Up |
| Z | Depth |
In Maya we use cm(centimeters) as our working unit. So that’s the scale of our models and the maya grid matches the grid in-game. The engine supports various file formats but we recommend .fbx or .obj when exporting. We also recommend that while you model, you think about how your part will fit in the in-game grid.

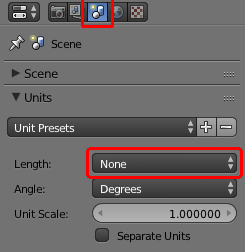
In Blender you can use use either "Metric" or "None" for your units. If you use metric then one meter == one block, if you use "none" then one "unit" == one block. The unit setting is in the Properties window under the Scene tab.
STEP 2: Now let’s put the textures we want for our new part mod in the Textures folder Located here: Objects>Textures
We’re going to use these 256x256 texture files.


- obj_wheels_peppermindwheel_dif.tga
- obj_wheels_peppermindwheel_asg.tga
- obj_wheels_peppermindwheel_nor.tga
For more in-depth information about textures in Scrap Mechanic see “How to make textures for scrap mechanic” further down.
STEP 3: Navigate to: Objects>Database>Shapesets
Here you will see two .json files, one for blocks and one for parts. Since we’re making a part mod open the parts.json file. It should be pretty empty, you need to add the proper information to define your new part.
To make this easier we have included a text documents that you can use as a template. Open the “part examples” text document and copy its contents. Go back to your parts.json file. Now replace the text in your parts.json file. So it looks like this:

STEP 4: Now it’s time to add the proper information in your .json file. The text marked with yellow is where you need to change it to match your files.

Let’s go through each of these functions:
- UUID: Every block/part has each own specific ID called UUID, no two blocks or parts share the same uuid. Generate your uuids here: [/www.uuidgenerator.net/ https://www.uuidgenerator.net/]
- dif/asg/nor: Is where you put in the names of your textures. It’s important that the textures are named correctly all dif textures must end with “_dif “ etc. The “.tga” is the texture format. For example if your texture is in PNG format it must say “.png”.
- color: This color code tells the game what default color your block/part will have. You can get the color code you want from the colour picker in Photoshop or a website that generate color codes.
- density: This is the volumetric weight of one block. 250 is light weight, 500 medium weight and 1250 is heavy weight. Example: A part with a volume of 8 blocks, with the density set to 250 will weigh 2000, but will still count as light weight.
- rotationSet: Determines the rotation steps for when you are placing your model ingame.
- cylinder: Creates a cylinder collision for the model. This can also be replaced with “box” or “hull”. Go to “How to write a part list” for more detailed information.
- sticky: Lets you choose which sides of the model that should be sticky.
- physicsMaterial: You can change collision sounds and effects by changing the material type.
For more in-depth information on how to edit .json files for parts see “Part list functions” further down.
How to make textures for scrap mechanic
Scrap Mechanic materials can make use of three different textures; diffuse, asg and normal maps. Diffuse defines the base color and texture for your material. ASG allows you to make areas transparent, specular, glowing or reflective. Normal maps are used for faking the lighting of bumps and dents.
Diffuse
It’s important to remember that if you want to be able to use the paint tool in game on your block you will need to make use of the alpha channel in the diffuse. The darker an area of the alpha is, the more it will be affected by the coloring.
ASG
Then we make what we call an ASG texture (Alpha, Spec, Glow… And Reflectivity). We use values of various colour channels to affect the material.
| Channel | Function | Value results |
| Red channel (Alpha) | Determines the transparency of the texture. | No red value = no transparency. |
| Green channel (Spec) | Sets the specular level of the texture. | No green value = no spec. |
| Blue channel (Glow) | Makes the texture emissive and glowing. | No blue value = no glow. |
| Alpha channel (Reflectivity) | Adds reflection to the texture. | White alpha value = maximum reflection. |
Normal Maps
Finally we make a normal map. These can be generated or created using various tools such as Quixel Ndo, Maya, Zbrush and many more.
Exporting textures
Make sure that you save your textures as .tga files and use the 32bits/pixel resolution to include the alpha channel. For normal maps, make sure the file name ends with “_nor.tga”.
Block list functions
Adding blocks to scrap mechanic is quite simple since you don’t need to link to any meshes. But there are various values and functions you can write in depending on what type of block you’d like to make. Below are various functions you can write in your .json file to modify the behaviour of your block.
UUID
UUID is your unique id for the part/block You can easily generate one at [/www.uuidgenerator.net/ https://www.uuidgenerator.net/] If you want to replace an old part instead of adding one, you use the same uuid as the one you wish to replace.
| Example UUID |
| e2543ac2-ed58-46d0-a593-13ff8d11e02b |
Texture Paths
Mod texture paths
| Texture definition | File path | Result |
| "dif" | "$MOD_DATA/Textures/examplename_dif.tga" | Links to your diffuse texture in your mod library. |
| "asg" | "$MOD_DATA/Textures/examplename_asg.tga" | Links to your asg texture in your mod library. |
| "nor" | "$MOD_DATA/Textures/examplename_nor.tga" | Links to your normal map texture in your mod library. |
Changing “$MOD_DATA” to “$GAME_DATA” allows you to link to an already existing texture from the local game library.
Material
Material changes what textures to be used for the mesh.
| Material definition | Result |
| “Dif” | Only diffuse is used for this material. |
| “DifAsg” | Diffuse and asg are used for this material. |
| “DifAsgNor” | Diffuse, asg and normal maps are used for this material. |
| “DifAsgNorFlip” | Renders both sides of all faces of the mesh. Can be useful if you’re making a window. |
More materials can be found in “...\Steam\steamapps\common\Scrap Mechanic\Data\Objects\Materials” partmaterials.json.
Color
“color” decides the default color for the material ingame. This will change when you paint the object with the paint tool.
| Example hex code | Result |
| “0000ff” | Makes blue the default color |
Density
The weight of a block/part is determined by the density value and its volume. Example: A part with a volume of 8 blocks, with the density set to 250 will weight 2000, but will still count as light weight.
| density
value |
Result |
| 250.0 | Light weight |
| 500.0 | Medium weight |
| 1250.0 | Heavy weight |
Tiling
Depending on your texture size, you should match a tiling value.
| Tiling value | Texture resolution | Result |
| 1 | 128 x 128 texture | Tiles every block |
| 2 | 256 x 256 texture | Tiles every 2nd block |
| 4 | 512 x 512 texture | Tiles every 4th block |
| 8 | 1024 x 1024 texture | Tiles every 8th block |
| 16 | 2048 x 2048 textures | Tiles every 16th block |
Physics Material
Physics materials affects the sound and particles of an object.
| grass |
| plastic |
| stone |
| wood |
| metal |
| glass |
Glass
If you want to create glass you can add this function to the list.
| "glass": true |
This will make your block transparent. You tweak the green channel and the alpha channel in the ASG texture to change the look of the glass.
Part list functions
Parts in Scrap Mechanic allows for many more functions than blocks. Below are various function you can write in the .json file to change the behaviour of your parts.
UUID
UUID is your unique id for the part/block You can easily generate one at [/www.uuidgenerator.net/ https://www.uuidgenerator.net/] If you want to replace an old part instead of adding one, you use the same uuid as the one you wish to replace.
| Example UUID |
| e2543ac2-ed58-46d0-a593-13ff8d11e02b |
Renderable
“renderable” defines what mesh will be rendered plus the submeshes, textures and their material. Most meshes consists of just one mesh, but adding a submesh allows another part of the mesh to use a different set of textures and material.
Mod texture list paths
Choose which textures to refer to by writing in the correct folder path.
| Texture definition | File path | Result |
| "dif" | "$MOD_DATA/Textures/examplename_dif.tga" | Links to your diffuse texture in your mod library. |
| "asg" | "$MOD_DATA/Textures/examplename_asg.tga" | Links to your asg texture in your mod library. |
| "nor" | "$MOD_DATA/Textures/examplename_nor.tga" | Links to your normal map texture in your mod library. |
Mesh path
Choose which mesh to refer to by writing in the correct folder path.
| Mesh definition | File path | Result |
| "mesh" | "$MOD_DATA/Objects/Mesh/examplename.fbx | Links to your mesh in your mod library |
Changing “$MOD_DATA” to “$GAME_DATA” allows you to link to an already existing mesh or texture from the local game library.
Material
Material changes what textures to be used for the mesh.
| Material definition | Result |
| “Dif” | Only diffuse is used for this material. |
| “DifAsg” | Diffuse and asg are used for this material. |
| "DifNor" | Diffuse and normal maps are used for this material. |
| “DifAsgNor” | Diffuse, asg and normal maps are used for this material. |
| “DifAsgNorFlip” | renders both sides of all faces of the mesh. Can be useful when your making a window. |
More materials can be found in “...\Steam\steamapps\common\Scrap Mechanic\Data\Objects\Materials” partmaterials.json.
Color
“color” decides the default color for the material ingame. This will change when you paint the object with the paint tool.
| Example hex code | Result |
| “0000ff” | Makes blue the default color |
Collision
The collision can be written in 3 different ways. Box, cylinder or hull.
Box
The box collision will create a box surrounding your mesh.
| Example box values | Result |
| "box": { "x": 1, "y": 2, "z": 3 } | Creates a box collision with the dimensions corresponding to the values of x,y and z. |
Cylinder
A cylinder collision is good to use for wheels or round objects.
| Example cylinder values | Result |
| "cylinder": { "diameter": 7, "depth": 1, "margin": 0.5, "axis": "Z" } | Diameter is the size of the cylinder. Depth sets the thickness. Margin sets the bevel amount, pretty much rounds the edges. Axis determines in which direction the cylinder is facing. |
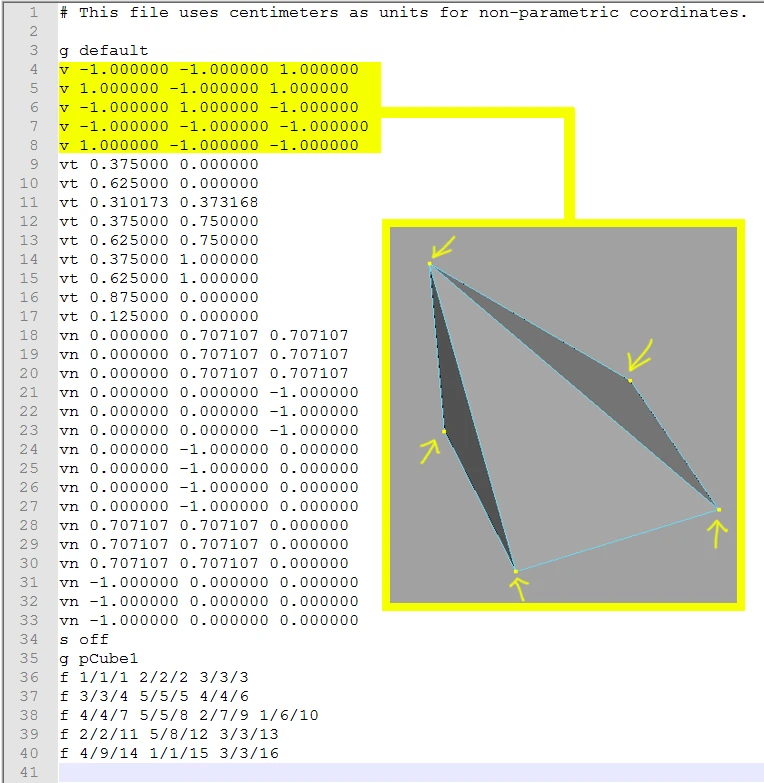
Hull
A hull collision is created using a pointlist. It draws lines between vertex coordinates. These vertex coordinates can be found if you for an example open an .obj mesh with a text editor. However it’s good to make a simplified mesh to not get too many coordinates in the list.
| Example hull values | Result |
| "hull": {
"x": 1, "y": 1, "z": 1, "pointList": [ { "x": 1.0, "y": -1.0, "z": -1.0 }, { "x": -1.0, "y": -1.0, "z": -1.0 }, { "x": -1.0, "y": -1.0, "z": 1.0 }, { "x": 1.0, "y": -1.0, "z": 1.0 } ] } |
x,y and z defines the size of a space/cube which the pointlist will fit itself in
Each row in the pointList of x,y and z refers to the location of a single vertex point. Together the rows create the hitbox shape. |
Density
The weight of a block/part is determined by the density value and its volume. The 'density' value is the weight per block of the part, regardless of the volume of the mesh or collision shape.
Example: A part with a volume of 8 blocks, with the density set to 250 will weigh 2000, but will still count as light weight.
| density
value |
Result |
| 250.0 | Light weight |
| 500.0 | Medium weight |
| 1250.0 | Heavy weight |
Physics Material
Physics materials affects the sound and particles of an object.
| grass |
| plastic |
| stone |
| wood |
| metal |
| glass |
| steering |
Interactive part list functions
Interactive functions
Interactive parts include buttons and switches, engines, seats and everything that has a specific function. Here’s all the functions you can add to your part list:
| "bearing": { } | bearing |
| "timedjoint": { } | controller |
| "lever": { } | switch |
| "button": { } | button |
| "sensor": { } | sensor |
| "radio": { } | radio |
| "horn": { } | horn |
| "logic": { } | logic gate |
| "timer": { } | timer |
These are easy to implement, just add them to your part list and you’re done. If you wish to make them animate, you’ll need some additional lines and models.
Pose animation
Lets take a closer look on the part list for an ordinary button:
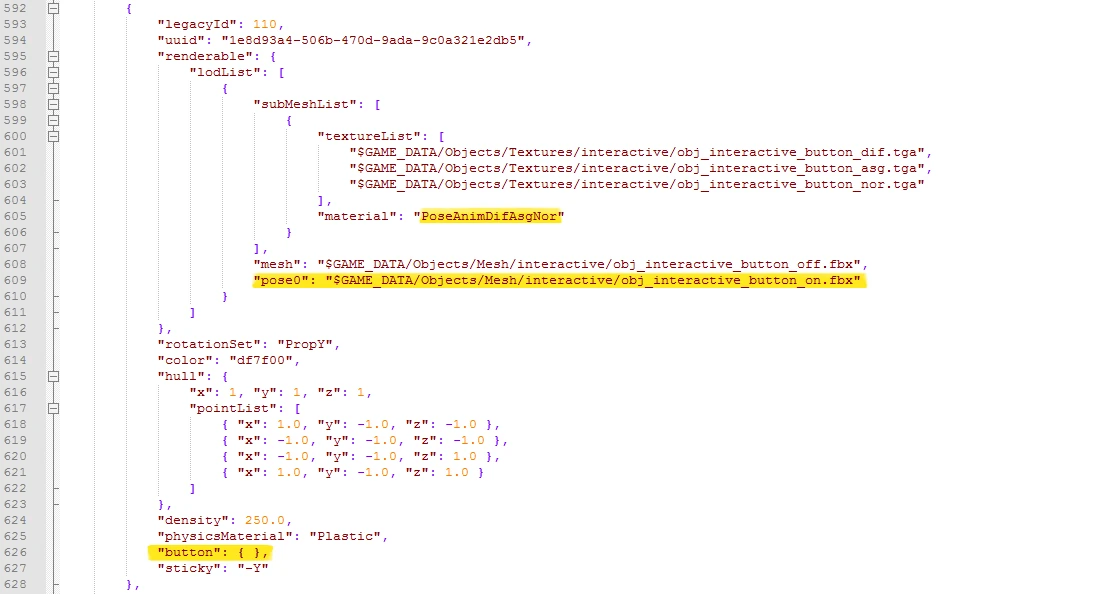
Here you can see that it’s not much different from the other part lists. The material has been changed to support pose animations.
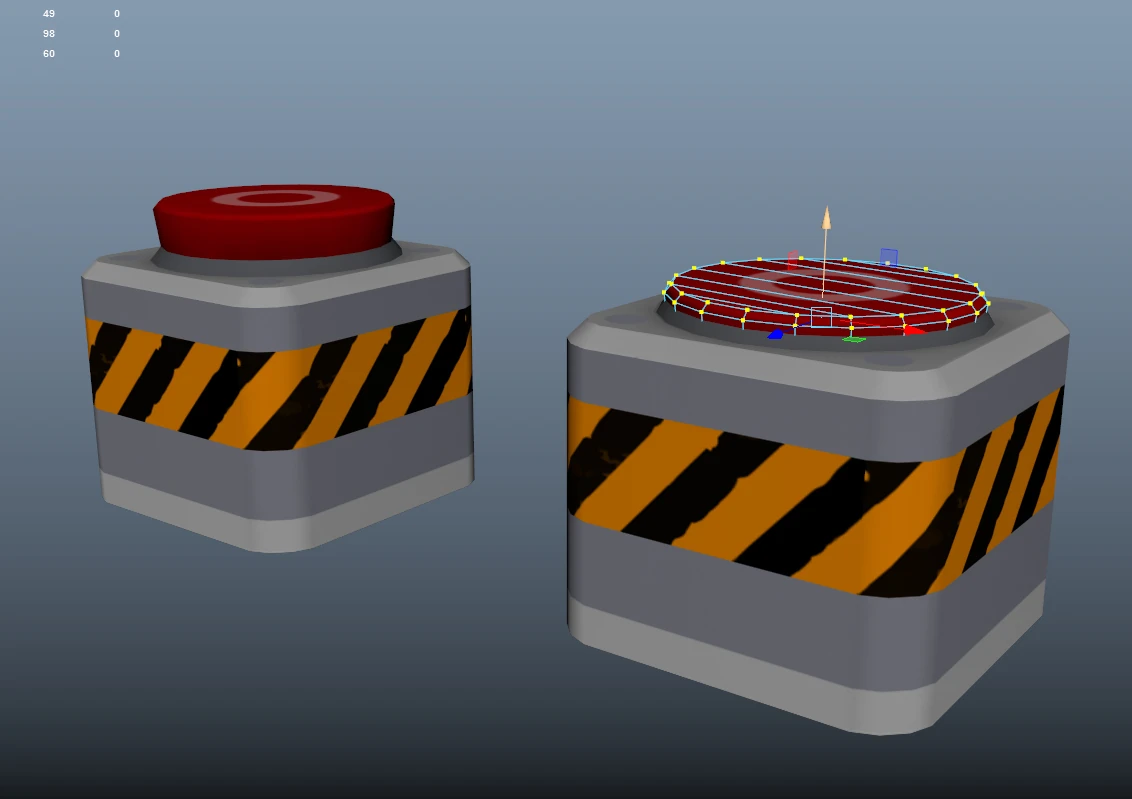
Pose animations are simple, and don’t require any animation.
You simply export two models, one with the model in its off state, in this case an unpressed button. And one in its on state, pushed button.
It’s important that these two models are identical, and that you only move vertices to get the other state.
Advanced interactive functions
These require some more lines to work properly, we recommend copying the .json file from the game files and then edit them to fit your mod. You can find the .json for all interactive parts here:
Steam\steamapps\common\Scrap Mechanic\Data\Objects\Database\ShapeSets
| "spring": { } | suspension |
| "steering": { } | driver seat |
| "seat": { } | seat |
| "engine": { } | engine |
| "thruster": { } | thruster |
| "tone": { } | tote bot head |
| "spotlight": { } | headlamp |
Crafting
Warning: Custom crafting recipes are currently not supported in workshop-compatible mods
Crafting is important for any block or item that you want to be accessible in survival mode, though it is relatively simple.

Recipes under their corresponding bench name will be crafted at that bench, with hideout being the trader,
dispenser is the mechanic station where the cookbot is built and workbench being the default craftbot that will spawn in certain structures.

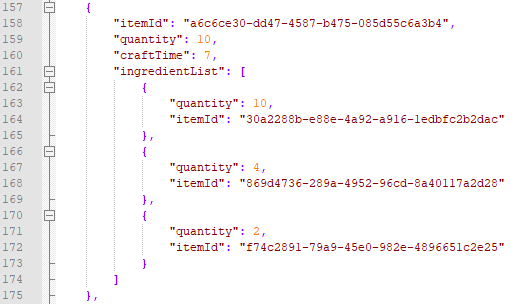
This is the vanilla code for the "Concrete1" crafting recipe as an example.
The first itemId is that of the block you want to craft, followed by how many of this item you want to be crafted under quantity, and how long (in seconds) it takes to craft this item under craftTime.
The quantity under ingredientList states how many of that specific block or part is necessary, i.e., four water for ten concrete.
Third-Party Utilities
Third-party utilities are used for modding Scrap Mechanic, but are not officially supported by Axolot Games.
Crafting Recipe Editors
Utilities for changing crafting recipes in survival mode.
- SMEMT (currently only supports Craftbot recipes)